John S. Denker |  |
See How It Flies 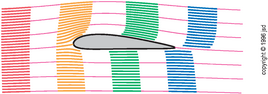
| A new spin on the perceptions, procedures, and principles of flight. | 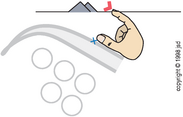 |
- Introduction
- Readership, Topics, and Objectives
- How to Use this Book
- 1 Energy Awareness and Energy Management
- 1.1 Total Energy Cannot Change
- 1.2 Energy Conversion
- 1.2.1 Converting Speed to Altitude and Back
- 1.2.2 Energy Per Unit Mass
- 1.2.3 Converting Fuel to Altitude
- 1.2.4 Power versus Energy
- 1.2.5 Drag and the Power Curve --- Introduction
- 1.2.6 Rates of Energy Conversion
- 1.3 Effect of Controls on Energy
- 1.3.1 Power Budget --- Using the Engine
- 1.3.2 The Effects of the Throttle
- 1.3.3 The Effects of the Yoke
- 1.3.4 Sizes of Energy Reservoirs
- 1.4 Energy Management Strategy
- 1.5 Summary: Energy Management
- 2 Angle of Attack Awareness and Angle of Attack Management
- 2.1 The Importance of Angle of Attack
- 2.2 Definition of Angle of Attack
- 2.3 Trim for Angle of Attack!
- 2.4 Three Contributions to Angle of Attack
- 2.5 Perceiving Pitch Angle
- 2.6 Making Changes in Angle of Attack
- 2.7 Fly with a Light Touch
- 2.8 Trim Won't Solve All The World's Problems
- 2.9 Pitch Attitude versus Angle of Attack
- 2.10 Power plus Attitude does not equal Performance
- 2.11 Estimating the Relative Wind
- 2.12 Airspeed Is Related to Angle of Attack
- 2.12.1 Airspeed versus Coefficient of Lift
- 2.12.2 Coefficient of Lift versus Angle of Attack
- 2.12.3 Correcting for Reduced Density
- 2.12.4 Correcting for Reduced Lift Requirements
- 2.12.5 Correcting for Increased Lift Requirements
- 2.12.6 Compute with Calibrated not Indicated Airspeed
- 2.12.7 Correcting for Slip
- 2.12.8 Drag and Lift-to-Drag Ratio
- 2.13 Not Everything Depends on Angle of Attack
- 2.13.1 Explicit Airspeed Limits
- 2.13.2 Maneuvering Speed
- 2.13.3 Overview of Limits and Performance Numbers
- 2.14 Absolute versus Geometric Angle of Attack
- 2.15 Summary
- 3 Airfoils and Airflow
- 3.1 Flow Patterns Near a Wing
- 3.2 Pressure Patterns Near a Wing
- 3.3 Stream Line Curvature
- 3.4 Bernoulli's Principle
- 3.4.1 Magnitude
- 3.4.2 Altimeters; Static versus Stagnation Pressure
- 3.4.3 Compressibility
- 3.5 Stall Warning Devices
- 3.6 Air Is A Fluid, Not A Bunch of Bullets
- 3.7 Other Fallacies
- 3.8 Inverted Flight, Cambered vs. Symmetric Airfoils
- 3.9 Thin Wings
- 3.10 Circulation
- 3.10.1 Visualizing the circulation
- 3.10.2 How Much Circulation? The Kutta Condition
- 3.10.3 How Much Lift? The Kutta-Zhukovsky Theorem
- 3.10.4 Quantifying the Circulation
- 3.11 Mechanically-Induced Circulation
- 3.12 Lift Requires Circulation & Vortices
- 3.12.1 Vortices
- 3.12.2 Wake Turbulence
- 3.12.3 Induced Drag
- 3.12.4 Soft-Field Takeoff
- 3.13 Frost on the Wings
- 3.14 Consistent (Not Cumulative) Laws of Physics
- 3.15 Momentum in the Air
- 3.16 Summary: How a Wing Produces Lift
- 4 Lift, Thrust, Weight, and Drag
- 4.1 Definitions
- 4.2 Balance of Forces
- 4.3 Forces During a Turn
- 4.4 Types of Drag
- 4.5 Coefficients, Forces, and Power
- 4.6 Induced vs. Parasite Drag
- 5 Vertical Damping, Roll Damping, and Stalls
- 5.1 Introduction and Overview
- 5.2 Vertical Damping
- 5.2.1 Origins of Vertical Damping
- 5.2.2 Loss of Vertical Damping
- 5.3 The Stall
- 5.3.1 Definition of Stall
- 5.3.2 Flying Beyond the Stall?
- 5.4 Roll Damping
- 5.4.1 Origins of Roll Damping
- 5.4.2 Loss of Roll Damping
- 5.4.3 Schemes to Increase Roll Damping
- 5.5 The Effect of Flaps
- 5.5.1 Effect on Stalling Speed
- 5.5.2 Effect on Incidence
- 5.5.3 Effect on Washout
- 5.5.4 Effect on Drag
- 5.5.5 Effect on Trim
- 5.5.6 Effect on Top Speed
- 5.6 Summary
- 6 Angle of Attack Stability, Trim, and Spiral Dives
- 6.1 The Basic Stability Principle
- 6.1.1 Center of Mass Too Far Aft
- 6.1.2 Center of Mass in the Middle
- 6.1.3 Center of Mass, Lift, and Area
- 6.1.4 Pitch-Wise Equilibrium
- 6.1.5 Canards Operate on the Same Principle
- 6.1.6 Beyond Decalage
- 6.1.7 Springs and Bobweights
- 6.1.8 Pitch Damping
- 6.1.9 Center of Mass Too Far Forward
- 6.1.10 Other Failure Modes
- 6.1.11 Practical Considerations
- 6.1.12 Phugoid Oscillations
- 6.2 Spiral Dive
- 6.2.1 Which Way Is Up?
- 6.2.2 Overview
- 6.2.3 General Discussion
- 6.2.4 Recovering From a Spiral Dive
- 6.2.5 Try It Yourself
- 6.3 Summary
- 7 More About Energy and Power
- 7.1 Introduction
- 7.2 Making Changes in Airspeed
- 7.2.1 Front Side of the Power Curve
- 7.2.2 Back Side of the Power Curve
- 7.2.3 Right versus Wrong Procedures
- 7.3 You Can Get Away With A Lot During Cruise
- 7.4 Let George Do It
- 7.5 Max Performance using the Power Curve
- 7.5.1 Best Rate of Climb
- 7.5.2 Zero Power Available
- 7.5.3 Best Angle of Climb
- 7.5.4 Power Depends on Altitude via True Airspeed
- 7.5.5 Other Power and Altitude Effects
- 7.5.6 Best Glide: Wind, Downdrafts, etc.
- 7.5.7 Weight Effects
- 7.6 Variations in the Power Curve
- 7.6.1 Power Curve Depends on Aspect Ratio
- 7.6.2 Sketching the Curve
- 7.6.3 Some Theory
- 7.6.4 Power Requirements versus Speed
- 7.6.5 Power Requirements versus Altitude
- 7.7 Energy Management Stunts
- 7.7.1 High-Speed Steep Descent
- 7.7.2 Low-Speed Steep Descent
- 7.7.3 Skimming in Ground Effect
- 7.8 Summary
- 8 Yaw-Wise Torque Budget
- 8.1 Overview
- 8.2 Yaw Stability
- 8.3 Yaw Damping
- 8.4 Helical Propwash
- 8.5 P-Factor
- 8.5.1 Blade Speed
- 8.5.2 Blade Angle
- 8.5.3 Initial Takeoff Roll
- 8.5.4 Observing P-Factor
- 8.6 Gyroscopic Precession
- 8.7 Canted Engine
- 8.8 Rudder Usage During Rolls
- 8.8.1 Analysis of a Roll
- 8.8.2 Designers' Tricks
- 8.8.3 Transitory Adverse Yaw
- 8.8.4 Steady Adverse Yaw -- Twisted Lift
- 8.8.5 Yaw-Wise Inertia
- 8.8.6 Amount of Rudder Required
- 8.8.7 Summary: Coordinated Turning Procedures
- 8.9 Long-Tail Slip
- 8.10 Boat Turn
- 8.11 Weathervaning During Taxi
- 8.12 Asymmetric Thrust
- 8.13 Yaw-Wise Torque Budget --- Summary
- 9 Roll-Wise Torque Budget
- 9.1 Dihedral
- 9.2 Other Forms of Slip-Roll Coupling
- 9.3 Roll-Wise Stability
- 9.4 Differential Wingtip Speed; Overbanking
- 9.5 Rolling Moment due to Propeller Drag
- 9.6 Engine Inertia
- 9.7 Climbing and Descending Turns
- 9.8 Roll-Wise Torque Budget --- Summary
- 10 Equilibrium, Stability, and Damping
- 10.1 Equilibrium
- 10.2 Stability
- 10.3 Damping
- 10.4 Relationship of Stability and Damping
- 10.5 Oleo-Pneumatic Struts
- 10.6 Oscillations
- 10.6.1 Analysis of Dutch Roll
- 10.6.2 How to Fight Oscillations
- 11 Slips, Skids, and Snap Rolls
- 11.1 A Lesson on Snap Rolls
- 11.2 Intentional Slips
- 11.3 Skids
- 11.4 Anticipate Correct Rudder Usage
- 11.5 Perceiving Slip, Perceiving Coordination
- 11.5.1 Looking Out the Side
- 11.5.2 Looking Out the Front
- 11.5.3 Using the Inclinometer Ball
- 11.5.4 Using the Seat of Your Pants
- 11.5.5 Intentional Slips
- 11.5.6 Slip Angle versus Bank Angle
- 11.6 Summary
- 12 Landing
- 12.1 Planning the Approach
- 12.1.1 Other Planning Issues
- 12.1.2 Traffic
- 12.1.3 Obstacle Clearance
- 12.2 Judging Left or Right
- 12.3 Judging High or Low; Rule of Thumb
- 12.4 Judging Pitch Attitude and Angle of Attack
- 12.4.1 Use Outside References and Trim
- 12.4.2 Observe and Control More Than One Thing
- 12.4.3 Correct for Wind
- 12.5 Other Perceptions
- 12.6 Basic Normal Landing
- 12.6.1 Short Final
- 12.6.2 Flare
- 12.6.3 Timing the Flare
- 12.6.4 Touchdown and Rollout
- 12.7 High-Performance Landing
- 12.7.1 Choose the Right Runway
- 12.7.2 Use the Right Configuration
- 12.7.3 Touch Down at the Right Point
- 12.7.4 Touch Down at a Low Speed
- 12.7.5 Use the Brakes
- 12.7.6 Summary: High-Performance Landing
- 12.8 Soft-field Landing
- 12.9 Crosswind Landing
- 12.9.1 Basics
- 12.9.2 Heading Control
- 12.9.3 Drift Control
- 12.9.4 Flare and Touchdown
- 12.9.5 737 Scheme
- 12.10 Going Around
- 12.11 Learning to Land the Airplane
- 12.11.1 Maneuver by Reference to the Edge
- 12.11.2 Hesitation Takeoff
- 12.11.3 Practice Maneuvering at Altitude
- 12.11.4 Practice Flaring and Stalling at Altitude
- 12.11.5 Practice Flying in the Runway Environment
- 12.11.6 Learn Soft-Field Procedure First
- 12.11.7 Nose-High Rollout
- 12.11.8 Recovering from an Evil Zoom
- 12.11.9 Salvaging an Imperfect Flare
- 12.12 Fly with a Light Touch
- 12.13 Critique Your Own Landings
- 13 Takeoff
- 13.1 Simplest Takeoff
- 13.2 Normal Takeoff
- 13.3 Obstructed-Field Takeoff
- 13.4 Soft-Field Takeoff
- 13.5 Crosswind Technique
- 13.6 Multi-Engine Takeoff
- 13.7 Planning and Decisionmaking
- 13.7.1 Monitoring Takeoff Performance (wrong)
- 13.7.2 Monitoring Takeoff Performance (right)
- 13.7.3 Causes of Diminished Power
- 13.7.4 Plan & Practice Rejected Takeoffs
- 13.7.5 After Liftoff: Departure Climb
- 13.8 Other Elements of the Takeoff
- 13.9 Summary
- 14 Cross-Country Flying
- 14.1 Pilotage
- 14.1.1 Airports Make Good Landmarks
- 14.1.2 One-Dimensional Landmarks
- 14.1.3 Choose Distinctive Landmarks
- 14.1.4 Doglegs
- 14.1.5 Reality-Based Navigation
- 14.2 Dead Reckoning
- 14.2.1 Course
- 14.2.2 Distance, Time, and Airspeed
- 14.2.3 Crosswind Correction
- 14.2.4 The Wind Triangle
- 14.2.5 Discussion
- 14.3 Navigating by Instruments
- 14.3.1 Don't Be a Gauge Junkie
- 14.3.2 Navigation Systems (Brief Survey)
- 14.3.3 Intended Heading
- 14.4 VOR Techniques
- 14.4.1 Off-Course Distance
- 14.4.2 Approaching the Station
- 14.4.3 Progress Along the Course
- 14.4.4 Twisted VORs
- 14.5 Combined Techniques
- 14.6 Staying Un-Lost
- 14.7 Getting Un-Lost
- 14.7.1 Basics
- 14.7.2 When in Doubt, Climb
- 14.7.3 GPS or LORAN
- 14.7.4 VOR Cross Radials or VOR/DME
- 14.7.5 Ask ATC
- 14.8 Flight Planning
- 15 Emergency Procedures
- 15.1 Engine Out Procedures
- 15.1.1 Emergency Checklist
- 15.1.2 Configuring for Glide
- 15.1.3 Return to Airport?
- 15.1.4 Power-Off Glide Perception and Planning
- 15.2 Preventing Emergencies
- 15.2.1 Safety Margins
- 15.2.2 Fuel Management
- 15.3 Dealing with Emergencies
- 16 Flight Maneuvers
- 16.1 Fundamentals
- 16.2 Seeing and Avoiding Other Traffic
- 16.3 Speeding Up and Slowing Down
- 16.4 Phugoids
- 16.5 Turns
- 16.6 Coordination Exercises
- 16.7 Constant-Heading Slips
- 16.8 Crabbing Along a Road
- 16.9 Slipping Along a Road
- 16.10 Familiarization Exercises; Configuration Changes
- 16.11 Transitioning to Fast and Complex Aircraft
- 16.12 Turns around a Point
- 16.13 Eights Around Pylons
- 16.14 Chandelles
- 16.15 Lazy Eights
- 16.16 Eights on Pylons
- 16.16.1 Turns on a Pylon
- 16.16.2 Eights on Pylons
- 16.17 Changing Headwinds and Tailwinds
- 16.17.1 Steady Wind
- 16.17.2 Albatross Effect: Winds that Vary with Altitude
- 16.17.3 Turning Downwind; Energy Budget
- 16.17.4 Summary: Changing Headwinds and Tailwinds
- 16.18 Remarks: Ground Reference Maneuvers
- 16.18.1 Accounting for the Wind
- 16.18.2 Entry Strategy
- 16.18.3 Visual Reference
- 16.18.4 Checklist
- 16.19 Slow Flight
- 16.19.1 Airspeed and Altitude
- 16.19.2 Yaw and Roll
- 16.19.3 Procedures and Perceptions
- 16.20 Stall Practice
- 16.20.1 Preliminaries
- 16.20.2 Provoking a Distinct Stall
- 16.20.3 Stall Recovery
- 16.20.4 Power-On Stalls
- 16.20.5 Accelerated Stalls
- 16.20.6 Evil Zooms
- 17 Multi-Engine Flying
- 17.1 Engine Out Scenarios
- 17.1.1 Takeoff
- 17.1.2 Climb
- 17.1.3 Slip String
- 17.1.4 Coordination
- 17.1.5 Perception and Initial Response
- 17.1.6 Yaw Control at Reduced Speeds
- 17.1.7 Minimum Control Speed --- Definitions
- 17.1.8 Effect of Altitude, Weight, etc.
- 17.1.9 Effect of Center of Mass
- 17.1.10 Effect of Drag (e.g. Landing Gear)
- 17.1.11 Roll Control
- 17.1.12 Critical Engine
- 17.2 Engine Out Procedures
- 17.2.1 Basic Takeoff Considerations
- 17.2.2 Balanced Field Length; Takeoff Decision Speed
- 17.2.3 Procedure: Low Altitude
- 17.2.4 Procedure: Higher Altitude
- 17.2.5 Airspeed Management
- 17.2.6 Engine-Out Go-Arounds
- 17.2.7 Low-Speed Engine-Out Demonstrations
- 18 Stalls and Spins
- 18.1 Stalls: Causes and Effects
- 18.2 Stalling Part vs. All of the Wing
- 18.3 Boundary Layers
- 18.3.1 Separated versus Attached Flow
- 18.3.2 Laminar versus Turbulent Flow
- 18.3.3 Boundary Layer Control
- 18.3.4 Summary
- 18.4 Coanda Effect, etc.
- 18.4.1 Tissue-paper Demonstration
- 18.4.2 Blowing the Boundary Layer
- 18.4.3 Teaspoon Demonstration
- 18.4.4 Fallacious Model of Lift Production
- 18.4.5 Summary
- 18.5 Spin Entry
- 18.6 Types of Spin
- 18.6.1 Spin Modes
- 18.6.2 Samaras, Flat Spins, and Centrifugal Force
- 18.6.3 NASA Spin Studies
- 18.6.4 Effects of Changes in Orientation of Spin
- 18.7 Recovering from a Spin
- 18.8 Don't Mess With Spins
- 19 The Laws of Motion
- 19.1 Straight-Line Motion
- 19.2 Sitting in a Rotating Frame
- 19.3 Moving in a Rotating Frame
- 19.4 Centrifuges with and without Gravity
- 19.4.1 The Centrifugal Field is Real
- 19.4.2 Centrifuge
- 19.4.3 Centrifuge and Gravity
- 19.5 Centrifugal Effects in a Turning Airplane
- 19.6 Angles and Axes
- 19.6.1 Directions of Rotation: Yaw, Pitch, and Roll
- 19.6.2 Attitude: Heading, Pitch, Bank
- 19.6.3 Angle Terminology
- 19.6.4 Yaw Does Not Commute with Pitch
- 19.6.5 Yaw Does Not Commute with Bank
- 19.7 Torque and Moment
- 19.8 Angular Momentum
- 19.9 Gyroscopes
- 19.9.1 Precession
- 19.9.2 Precession: Which Way and How Much
- 19.9.3 Inertial Platform
- 19.10 Gyroscopic Instruments
- 19.10.1 Heading Indicator
- 19.10.2 Artificial Horizon
- 19.10.3 Rate-of-Turn Gyro
- 20 The Atmosphere
- 20.1 Circulation Around Fronts and Low Pressure Centers
- 20.1.1 Flow Around a Low
- 20.1.2 Fronts and Troughs
- 20.2 Pressure and Winds Aloft
- 20.2.1 Thermal Gradient Wind
- 20.2.2 Altimetry
- 20.2.3 High Altimeter due to Low Temperature
- 20.3 Prevailing Winds and Seasonal Winds
- 20.3.1 Primary Circulation Patterns
- 20.3.2 Continental / Oceanic Patterns
- 20.4 Summary
- 21 Pilot-In-Command Decisionmaking
- 21.1 Decisionmaking In General
- 21.2 Decisionmaking during Lessons
- 21.2.1 Please Act As PIC During Lessons
- 21.2.2 How's Your Workload?
- 21.2.3 I've Got It
- 21.2.4 Hood Work
- 21.3 Layers of Safety
- 21.4 Example: Obstacle Clearance
- 21.5 Flow Pattern
- 21.6 Checklists
- 21.7 Personal Minimums
- 21.8 Skepticism, and Crisp Execution of Plan B
- 21.9 Leadership and Resource Management
- 21.10 Learn from the Experience of Others
- 21.11 Try to Outdo Yourself
- Bibliography
- About the Book
- About the Web Site
- Configuring and Troubleshooting your Browser
- Search This Site
- About the Author
- Index
|

